

A step-by-step guide to CI/CD using Databricks Asset Bundles and the Nutter framework

These days continuous integration (CI) and continuous delivery/deployment (CD) is used throughout most disciplines of software and data. Within the realms of data engineering and big data however, the implementations can at times be quite challenging, considering tasks can span across platforms, frameworks, syntax, etc.
In this post we'll walk through a basic example of how we can leverage Databricks Asset Bundles (DABs) for CI/CD. We will be running both our data transformation logic and the associated testing (integration tests) on the databricks platform resulting in a simple-to-understand, cloud provider agnostic CI/CD implementation. We'll also be using the Nutter testing framework for the purposes of testing our code (you'll find the github repo here if you're not familiar with the framework).
Let's get into it!
Pre-requisites
Below are the resources (platform, framework, tools) used throughout. To exactly replicate what I'll be doing herein you'll obviously need to use all of the below. To replicate the overall pattern however, you essentially only need a Databricks workspace and the Databricks CLI.
Azure Subscription for hosting cloud infrastructure (Databricks workspace and associated storage account)
Azure Databricks (Required, Unity Catalog enabled)
Databricks CLI
Nutter Framework for testing
Azure DevOps (Used as code repository and to run CI/CD pipelines using Azure pipelines)
Setting up your DAB
For this you'll need the Databricks CLI installed and configured for your Databricks workspace. Here's a link that'll get you started on that if you're not already up and running.
To generate some boilerplate code we'll use the out-of-the-box template that the Databricks CLI can generate for us. We'll change it as we go.
Run the following in a directory where you would like to initialize your project (I'm running this in bash but it should look the same in any command line shell):
databricks bundle init
This will prompt you to choose one of two templates to use:

choose default-python. You will then be prompted to choose a name for your project and if the project should include stub code for a number of different things; only opt for yes when asked: Include a stub (sample) notebook in ...:. We'll be adding and altering notebooks on our own but this will give us some additional boilerplate code that we'll need.
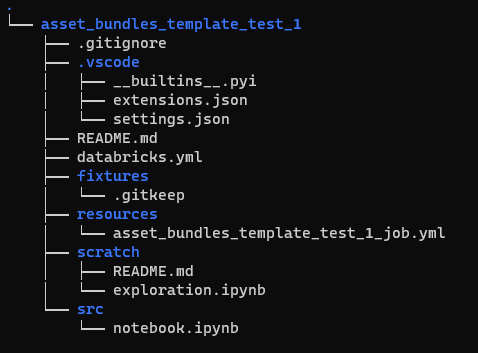
Once done we'll see something like this in our project folder:
Asset Bundle Definition
The databricks.yml is the so called Asset Bundle Definition. It contains references to assets that will be deployed to our workspace and how to deploy them. Have a look at the comments in the code and this for a deeper dive.
As we opted to use the template when generating this definition, it already contains some predefined mappings. Let's add some additional mappings to explore neat functionality available to us. Go ahead and replace your asset bundle definition with the following:
workspace: host and run_as: username mappings with values appropriate to you# This is a Databricks asset bundle definition for asset_bundles_template_test_1.
# See https://docs.databricks.com/dev-tools/bundles/index.html for documentation.
bundle:
name: source-A-bundle
include:
- resources/*.yml
sync:
exclude:
- .vscode
- .gitignore
- fixtures
variables:
prod_path:
description: 'Folder in which bundle
will be deployed when approved for production (-t prod)'
default: /Production/${bundle.name}/
cluster_id_testing_cluster:
description: id of cluster used for (nutter) testing
default: [TBD]
targets:
# The 'dev' target, for development purposes. This target is the default.
dev:
# We use 'mode: development' to indicate this is a personal development copy:
# - Deployed resources get prefixed with '[dev my_user_name]'
# - Any job schedules and triggers are paused by default
# - The 'development' mode is used for Delta Live Tables pipelines
mode: development
default: true
workspace:
host: https://adb-xxxxxxxxxxxxxxxx.xx.azuredatabricks.net
#############################################################################################################################
# The 'prod' target, used for production deployment.
prod:
# We use 'mode: production' to indicate this is a production deployment.
# Doing so enables strict verification of the settings below.
mode: production
workspace:
host: https://adb-xxxxxxxxxxxxxxxx.xx.azuredatabricks.net
# We only have a single deployment copy for production,
# so we use a shared path.
root_path: ${var.prod_path}
run_as:
# This runs as user.name@domain.com in production.
# We could also use a service principal here
# using service_principal_name
# (see https://docs.databricks.com/dev-tools/bundles/permissions.html).
user_name: user.name@domain.com
sync:
include:
- src/*
resources:
jobs:
source_A_etl:
job_clusters:
- job_cluster_key: job_cluster_category_1
new_cluster:
spark_version: 13.3.x-scala2.12
node_type_id: Standard_D5_v2
autoscale:
min_workers: 5
max_workers: 10
tasks:
- task_key: upload_to_bronze
job_cluster_key: job_cluster_category_1
notebook_task:
notebook_path: ./src/source_A_1_raw_to_bronze_notebook.py
- task_key: bronze_to_silver
job_cluster_key: job_cluster_category_1
notebook_task:
notebook_path: ./src/source_A_2_bronze_to_silver_notebook.py
- task_key: silver_to_gold
job_cluster_key: job_cluster_category_1
notebook_task:
notebook_path: ./src/source_A_3_silver_to_gold_notebook.py
Dont pay too much attention to the definition as it stands currently, we'll walk through it a bit later. We'll set up some jobs, notebooks, pipelines and a cluster first.
Databricks Jobs definitions
If we navigate to the ./resources/ folder in our bundle we'll find a single .yml file. By default the /resources/folder is where we look for the Databricks jobs definitions that will be deployed as part of our bundle (notice the include: section at the top of the databricks.yml file above).
Let's imagine we're setting this bundle up to process some data source, let's say.. source A, and want the whole ETL process (bronze, silver, gold) to be stored in a single job. We'll call this job source_A_end_to_end_job.yml (I really let the imagination flow on that one). So go ahead and rename the single .yml file to that.
The goal is to store and run both our ETL jobs and our tests in Databricks. This is how we'll do it: let's go ahead with setting up a job definition for integration testing.
Create a new .yml file in ./resources/ and call it integration_test_source_A_end_to_end_job.yml.
source_A_end_to_end_job.yml
Our ETL job will run 3 notebooks, transforming data from one layer of the lakehouse to the next using a job cluster. Replace the contents of source_A_end_to_end_job.yml with the following:
# job for asset_bundles_template_test_1.
resources:
  jobs:
    source_A_etl:
      name: source_A_etl

      tasks:
        - task_key: upload_to_bronze
          notebook_task:
            notebook_path: ../src/source_A_1_raw_to_bronze_notebook.py
          job_cluster_key: job_cluster

        - task_key: bronze_to_silver
          notebook_task:
            notebook_path: ../src/source_A_2_bronze_to_silver_notebook.py
          depends_on:
            - task_key: upload_to_bronze
          job_cluster_key: job_cluster

        - task_key: silver_to_gold
          notebook_task:
            notebook_path: ../src/source_A_3_silver_to_gold_notebook.py
          depends_on:
            - task_key: bronze_to_silver
          job_cluster_key: job_cluster

      job_clusters:
        - job_cluster_key: job_cluster
          new_cluster:
            spark_version: 13.3.x-scala2.12
            node_type_id: Standard_D3_v2
            num_workers: 1
Hopefully databricks jobs are vaguely familiar to you already. If not, here's the link to the docs - read up!.
Nevertheless, here we are defining a job named source_A_etl that runs 3 tasks in sequence. Upload_to_bronze (1), bronze_to_silver (2) and silver_to_gold (3)
integration_test_source_A_end_to_end_job.yml
Copy the following into the integration test job definition (integration_test_source_A_end_to_end_job.yml):
# job for asset_bundles_template_test_1.
resources:
  jobs:
    integration_test_end_to_end_job:
      name: integration_test

      tasks:
        - task_key: source_a_end_to_end_integration_test
          notebook_task:
            notebook_path: ../tests/test_source_A_end_to_end.py
          existing_cluster_id: ${var.cluster_id_testing_cluster}
The job definition specifies a databricks job named integration_test_source_a_end_to_end_job and will run a single notebook task on an existing interactive cluster which we will provision for testing purposes only. Notice that the value for the existing_cluster_id is a variable here. If you check our asset bundle definition, in the mapping variables: cluster_id_testing_cluster: default:, you'll see [TBD]. That's where we'll be putting the cluster id for our cluster once we've provisioned it.
Neat, right? We can define variables in the top level mapping of our bundles and use them throughout!
Notebooks for ETL workload
To keep this post as digestible as possible, what we can do is copy the below code into 3 separate python files: source_A_1_raw_to_bronze_notebook.py, source_A_1_raw_to_bronze_notebook.py, source_A_3_silver_to_gold_notebook.py and place these in the ./src/ folder:
# Databricks notebook source
import pyspark.sql.functions as F

# COMMAND ----------

source_table_name= dbutils.widgets.get("source_table")
destination_table_name = dbutils.widgets.get("destination_table")

# COMMAND ----------

source_df = spark.read.table(source_table_name)
for column in source_df.columns:
    processed_df = source_df.withColumn(column, F.repeat(column,2))
    source_df = processed_df
processed_df = processed_df.sort(F.col("col_1").asc())

# COMMAND ----------

processed_df.write.mode("overwrite").saveAsTable(destination_table_name)
Some simple lines of code here - the point isn't to carry out some extravagant transformations but rather to move data from bronze -> gold. The transformation logic above simply reads a source table, repeats the values in each column twice and writes the new dataframe to a table in Unity Catalog.
Notebook for testing
Go ahead and create a new ./tests/ folder in our project root folder and create a .py file called test_source_A_end_to_end.pythere. Place the following inside it:
# Databricks notebook source
# DBTITLE 1,Imports
from runtime.nutterfixture import NutterFixture, tag
import random
from pyspark.testing import assertDataFrameEqual

# COMMAND ----------

# DBTITLE 1,Test Data (input)
test_data = [
        ("1", "foo", "a", "x"),
        ("2", "bar", "b", "y"),
        ("3", "baz", "c", "z")]

test_schema =["col_1", "col_2", "col_3", "col_4"]

test_df = df = spark.createDataFrame(test_data, test_schema)

# COMMAND ----------

# DBTITLE 1,Expected data (output)
expected_data = [
        ("11111111", "foofoofoofoofoofoofoofoo", "aaaaaaaa", "xxxxxxxx"),
        ("22222222", "barbarbarbarbarbarbarbar", "bbbbbbbb", "yyyyyyyy"),
        ("33333333", "bazbazbazbazbazbazbazbaz", "cccccccc", "zzzzzzzz")]

expected_schema =["col_1", "col_2", "col_3", "col_4"]

expected_df = df = spark.createDataFrame(expected_data, expected_schema)

# COMMAND ----------

# create unique test-identifier to be used as prefix
# for tables created during test
test_identifier = random.randint(0,1000)

#define variables that are to be used/passed during test
layers = ["raw", "bronze", "silver", "gold"]
table_name_dict = {layer: f"{layer}.source_a.{test_identifier}_{layer}_table"
                   for layer in layers}

#construct argument dict to pass to dbutils.notebook.run
bronze_args = {"source_table": table_name_dict["raw"],
               "destination_table": table_name_dict["bronze"]}

silver_args = {"source_table": table_name_dict["bronze"],
               "destination_table": table_name_dict["silver"]}

gold_args = {"source_table": table_name_dict["silver"],
             "destination_table": table_name_dict["gold"]}

# COMMAND ----------

class MyTestFixture(NutterFixture):

   def before_source_a_end_to_end(self):
      print(test_identifier)

      #create raw data table using test data
      test_df.write.saveAsTable(table_name_dict["raw"])

   def run_source_a_end_to_end(self):
      (dbutils.notebook
       .run('./source_A_1_raw_to_bronze_notebook', 600, bronze_args))
      (dbutils.notebook
       .run('./source_A_2_bronze_to_silver_notebook', 600, silver_args))
      (dbutils.notebook
       .run('./source_A_3_silver_to_gold_notebook', 600, gold_args))

   def assertion_source_a_end_to_end(self):
      output_df = spark.read.table(table_name_dict["gold"])
      assertDataFrameEqual(expected_df, output_df)

   def after_source_a_end_to_end(self):
      [spark.sql(f"DROP TABLE {table_name_dict[layer]}") for layer in layers]

result = MyTestFixture().execute_tests()
print(result.to_string())
# Comment out the next line (result.exit(dbutils))
# to see the test result report from within the notebook
result.exit(dbutils)
The notebook above is our testing notebook. It uses the Nutter framework to build our test up, run it, assert the results and finally, tear it down. Before the actual test starts however, we define our input data, our expected output and some parameters to pass to the notebooks (source- and destination table names).
As you might have noticed, the notebook only contains integration tests. We could just as easily be running unit tests as well with Nutter, but I thought integration tests are a bit more interesting as there are many different ways one can go about doing them. In fact, the way I generally like to think about integration tests (primarily when it comes to data transformation pipelines) is to go for an approach in which the "path" the data takes to it's final form is irrelevant; we view that as a black box. We only really care about if the data looks the way we expect it to after our input has been processed by all steps in the ETL workflow.
Hypothetically, if we were to scale this approach up to test more ETL flows, all we would actually have to do is to define testing notebooks for each flow and add corresponding tasks running those notebooks in integration_test_source_A_end_to_end_job.yml.
Set up an interactive cluster
We'll set up an interactive cluster to run our nutter test. This might not be best practice in general as you'd probably want to use a job cluster for this as well, but let's just run with this for demonstration purposes.
Once provisioned, the easiest way to get the cluster id is to go to the cluster itself in the databricks web UI and view its JSON definition. Grab the id and paste it into our asset bundle definition in the mapping variables: cluster_id_testing_cluster: Default:.
Also, make sure to install Nutter on this cluster.
Rundown of the DAB
So, we now have all our components ready. Let's have a quick look at our asset bundle definition to try and figure out what's in fact happening, bit-by-bit:
           bundle:
             name: source-A-bundle
Naming our bundle:
source-A-bundle.This is mostly useful for the directory name in which bundle files are saved to in our workspace.include: - resources/*.ymlDefining which configuration files to include during the deployment of the bundle: we placed the workflow jobs definitions inside the
./resources/folder. We are simply wildcard searching said directory as we want to include both job files therein.sync: exclude: - .vscode - .gitignore - fixturesExcluding files and directories from being saved to the databricks workspace during deployment: to keep our workspace nice and clean we might want to exclude some files that are present in our project folder. Here I have decided to exclude the vscode settings directory, the .gitignore file and the fixtures directory.
           variables:
             prod_path:
               description: 'Folder in which bundle
               will be deployed when approved for production (-t prod)'
               default: /Production/${bundle.name}/

             cluster_id_testing_cluster:
               description: id of cluster used for (nutter) testing
               default: xxxx-xxxxxx-xxxxxxxx
Defining variables to use within our bundle: Here we are defining two variables, one which we will use to point to a specific path in the workspace for which we want our asset bundle files to be deployed to and another to store the cluster id of our interactive cluster that we will use for running our nutter test.
Note that we only use these parameters to a very limited extent, so the utility of the functionality might not be fully apparent. You can imagine how convenient it would be if we had a large number of jobs, all using the testing cluster. If for any reason we wanted to change the cluster (and by extension, had to update the cluster id) we would have to dig through a lot of YAML configurations (yuck).
Another quite useful functionality is that you can overwrite the default values of the variables as part of a bundle command. We wont be exploring that in this post but its worthwhile mentioning it.
Such an operation could look something like this:
databricks bundle deploy --var="prod_path=/foo/bar/path/, cluster_id_testing_cluster=l33t.5p34k"You'll find more details on custom variables here.
           targets:
             # The 'dev' target, for development purposes.
             # This target is the default.
             dev:
               # We use 'mode: development' to indicate this is a
               # personal development copy:
               # - Deployed resources get prefixed with '[dev my_user_name]'
               # - Any job schedules and triggers are paused by default
               # - The 'development' mode is used for Delta Live Tables
               #      pipelines
               mode: development
               default: true
               workspace:
                 host: https://adb-xxxxxxxxxxxxxxxx.xx.azuredatabricks.net
Defining the dev target: The comments in the file itself are pretty explanatory so let's move on.
               # The 'prod' target, used for production deployment.
             prod:
               # We use 'mode: production' to indicate this is a
               # production deployment.
               # Doing so enables strict verification of the settings below.
               mode: production
               workspace:
                 host: https://adb-xxxxxxxxxxxxxxxx.xx.azuredatabricks.net
                 # We only have a single deployment copy for production,
                 # so we use a shared path.
                 root_path: ${var.prod_path}
               run_as:
                 # This runs as user.name@domain.com in production.
                 # We could also use a service principal here
                 # using service_principal_name
                 # (see https://docs.databricks.com/dev-tools/bundles/permissions.html).
                 user_name: user.name@domain.com

               sync:
                 exclude:
                   - resources

               resources:
                 jobs:
                   source_A_etl:
                     job_clusters:
                       - job_cluster_key: job_cluster_category_1
                         new_cluster:
                           spark_version: 13.3.x-scala2.12
                           node_type_id: Standard_D5_v2
                           autoscale:
                             min_workers: 5
                             max_workers: 10
                     tasks:
                       - task_key: upload_to_bronze
                         job_cluster_key: job_cluster_category_1
                         notebook_task:
                           notebook_path: ./src/source_A_1_raw_to_bronze_notebook.py

                       - task_key: bronze_to_silver
                         job_cluster_key: job_cluster_category_1
                         notebook_task:
                           notebook_path: ./src/source_A_2_bronze_to_silver_notebook.py

                       - task_key: silver_to_gold
                         job_cluster_key: job_cluster_category_1
                         notebook_task:
                           notebook_path: ./src/source_A_3_silver_to_gold_notebook.py
Defining our prod target: here, we use the variable prod_path to specify that when the bundle deployment is tagged with -prod, it will place the bundle files within the path
/Production/source-A-bundle/in our databricks workspace. Also, notice thesync: exclude:mapping here. We are essentially adding to the top level mapping to also exclude the./resources/folder as well.Furthermore, and probably a lot more interesting, is the fact that we are overwriting the job cluster to be used by the tasks in the
source_A_etljob from within our asset bundle definition. Recall that the job cluster that is defined in./resources/source_A_end_to_end_job.ymlonly has 1 worker, runs a Standard_D3_v2 node type and is named job_cluster. In other words, when deploying to our prod target, the job cluster that's assigned to the tasks within thesource_A_etljob will be different from when deploying to our dev target.
You might have noticed that I'm using a single workspace throughout this example and that I'm only using two environments: development and production. In practice, one might want multiple environments where different types of testing is carried out and also to separate these environments into different Databricks workspaces. Adjusting the bundle definition to do just that is no harder than defining additional targets in our bundle definition and setting up corresponding url's in the mapping workspace: host:.
CI/CD
As DABs will handle removing and adding changes since previous deployments all on its own, and having designed our tests to run in the databricks workspace on a databricks cluster, CI/CD is now quite a simple task.
Manual Deployment
Let's try out a manual deployment to our dev target for demonstration purposes first. Go ahead and open your console and navigate to where the databricks.yml file is located (for reference, this is called the bundle root).
From here run the following:
databricks bundle deploy
once the deployment's finished, you'll see something similar to the below screenshot in the workflows tab of your Databricks workspace:
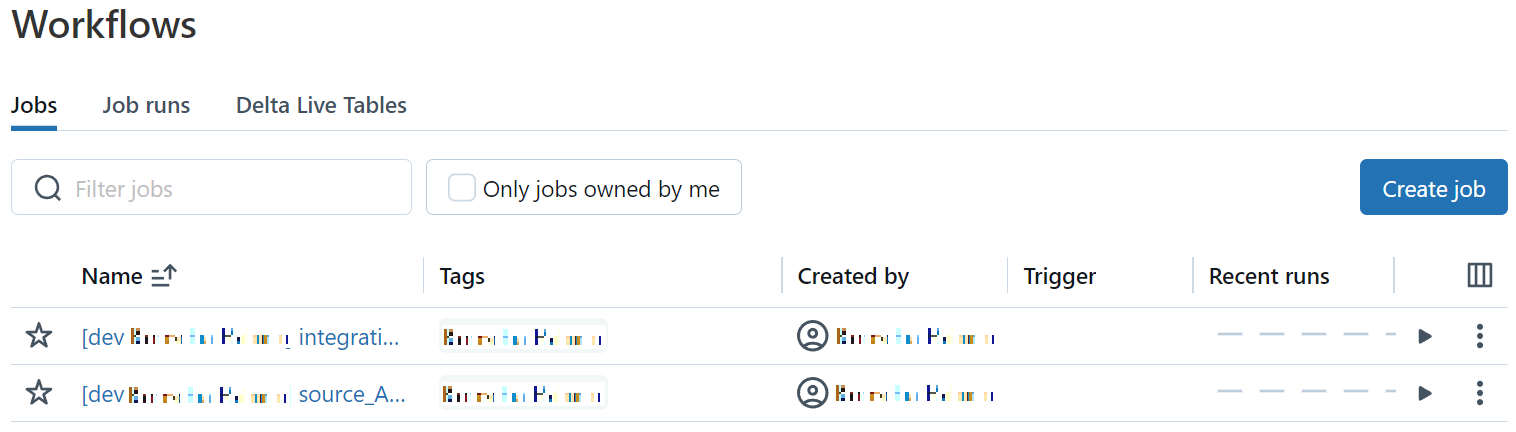
Notice how the job names are prefixed with [dev username]. This is the behaviour if a bundle target is tagged as development (already stated in the code comments above).
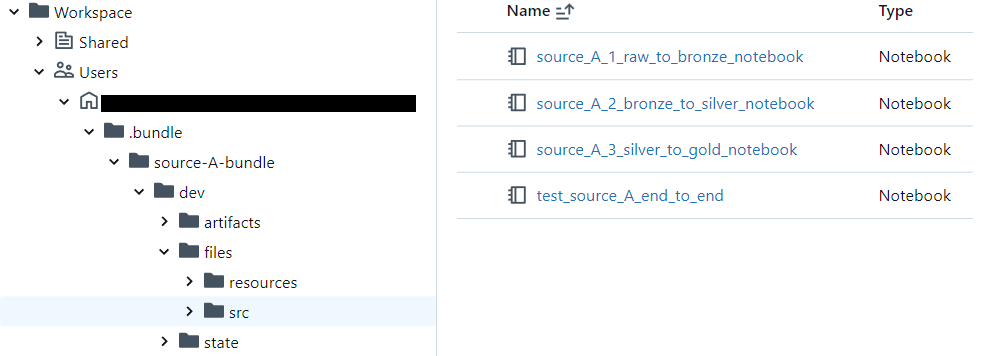
Additionally, we'll find the bundle files themselves in the default deployment path /Users/username/.bundle/bundle.name:
Although deploying manually can be useful during development, it's not something one would rely on in a robust CI/CD implementation, regardless of how easy and convenient the deployment might be.
Automatic CI/CD
In my case, I'll use Azure pipelines in Azure DevOps to run the CI/CD pipelines. The specific commands will look different if you're using other services (such as github actions on github), but the overall steps should remain the same.
The CI pipeline looks like this:
# Specify the trigger event to start the build pipeline.
# In this case, new code merged into master branch initiates a new build.
trigger:
  branches:
    include:
    - 'master'

# Specify the operating system for the agent that runs on the Azure virtual
# machine for the build pipeline (known as the build agent). The virtual
# machine image in this example uses the Ubuntu 22.04 virtual machine
# image in the Azure Pipeline agent pool. See
# https://learn.microsoft.com/azure/devops/pipelines/agents/hosted#software
pool:
  vmImage: ubuntu-22.04

variables:
  - group: databricks-asset-bundle-VB

# Download the files from the designated branch in the remote Git repository
# onto the build agent.
steps:
- checkout: self
  persistCredentials: true
  clean: true

- task: UsePythonVersion@0
  inputs:
    versionSpec: '3.10'
    addToPath: true
    architecture: 'x64'

- script: |
    curl -fsSL https://raw.githubusercontent.com/databricks/setup-cli/main/install.sh | sh
  displayName: 'Install Databricks CLI'


- script: |
    set -e
    export DATABRICKS_BUNDLE_ROOT=`pwd`/$(DAB_PATH)
    databricks bundle validate
    databricks bundle deploy -t dev
    databricks bundle run integration_test_source_A_end_to_end_job
    databricks bundle destroy -t dev --auto-approve
  displayName: 'Validate, deploy, run integration tests and finally destroy bundle (if successfull) on dev target'

# Create the deployment artifact and then publish it to the
# artifact repository.
- task: ArchiveFiles@2
  inputs:
    rootFolderOrFile: '$(Build.Repository.LocalPath)/$(DAB_PATH)'
    includeRootFolder: false
    archiveType: 'zip'
    archiveFile: '$(Build.ArtifactStagingDirectory)/$(Build.BuildId).zip'
    replaceExistingArchive: true

- task: PublishBuildArtifacts@1
  inputs:
    ArtifactName: 'DatabricksBuild'
Below is a bullet list of steps you should follow to set up your own CI pipeline in case you're not using Azure Pipelines:
Set up what triggers your pipeline: in the case above the pipeline is triggered on commits to master branch. This makes sense as we are integration testing our code which can be a longer and more expensive process when comparing to unit tests for example. If we had those aswell however, we might want them to be triggered on commits to our feature branches as well.
Set up environment variables: this step is not required, but makes working with the databricks CLI a lot simpler. In this case I'm using a DevOps variable group to store the workspace path and a databricks PAT. When the databricks CLI is called in the subsequent steps, it will automatically pick these up to authenticate to the specified workspace.
Install the Databricks CLI
Validate and deploy the bundle with dev as the target: we simply call the two following commands:
databricks bundle validatedatabricks bundle deploy -t dev
Note that-t devis not in fact required as the dev target is set as our default target but it never hurts to be verbose.Run the testing job: in our case, the testing job is named
integration_test_source_A_end_to_end_jobso all we need to do is run
databricks bundle run integration_test_source_A_end_to_end_jobto trigger it.Make sure that the ci pipeline fails if the databricks job returns an error/failure message (
set -eis used in the case above)Clean up the workspace: to remove the dev target bundle we can simply run
databricks bundle destroy --auto-approveAs we saw above, the prefix that comes with targets tagged as development make it quite apparent what they are and so this step is not a requirement.
Finally, let's have a look at the CD pipeline:
trigger:
  branches:
    exclude:
    - '*'

resources:
  pipelines:
  - pipeline: ci_pipeline # Name of the pipeline resource.
    source: Kooscha_R-DAB-ci # The name of the pipeline referenced by this pipeline resource.
    trigger: true # Run cd pipeline when any run of ci_pipeline completes

pool:
  vmImage: ubuntu-latest

variables:
  - group: databricks-asset-bundle-VB

steps:

- task: DownloadPipelineArtifact@2
  inputs:
    buildType: 'specific'
    project: 'xxxxxxxx-xxxx-xxxx-xxxx-xxxxxxxxxxxx'
    definition: '21'
    specificBuildWithTriggering: true
    buildVersionToDownload: 'latest'
    targetPath: '$(Pipeline.Workspace)/Artifact/'
  displayName: 'Download Pipeline Artifact'

- task: ExtractFiles@1
  inputs:
    archiveFilePatterns: '$(Pipeline.Workspace)/Artifact/DatabricksBuild/*.zip'
    destinationFolder: '$(Pipeline.Workspace)/Unzip/'
    cleanDestinationFolder: true
    overwriteExistingFiles: true
  displayName: 'Unzip artifact'

- script: |
    curl -fsSL https://raw.githubusercontent.com/databricks/setup-cli/main/install.sh | sh
  displayName: 'Install Databricks CLI'

- script: |
    export DATABRICKS_BUNDLE_ROOT=$(Pipeline.Workspace)/Unzip/
    databricks bundle deploy -t prod
  displayName: 'deploy bundle to prod target (-t prod)'
Again digressing the details, the deployment is triggered on successful completion of the CI pipeline and simply involves deploying our bundle but this time with prod as our target.
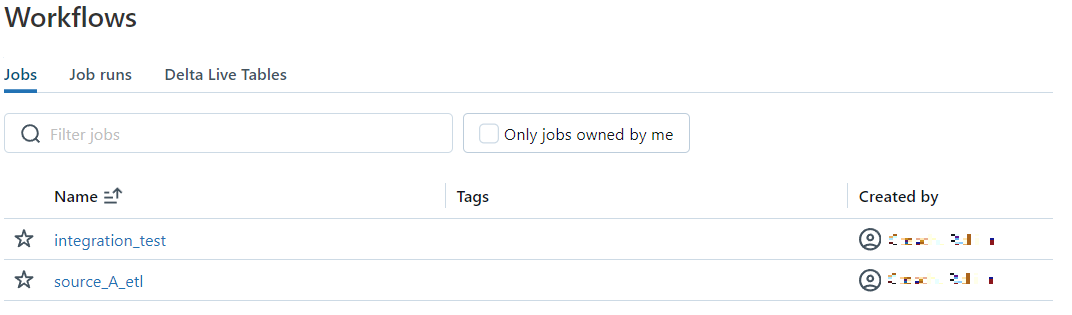
Ultimately, if our setup is correct and all has been implemented as it should, we should see the following in the workflows tab in our workspace:
If we look over at the job runs section, we'll also see that our nutter notebook was executed with our dev target notebook:

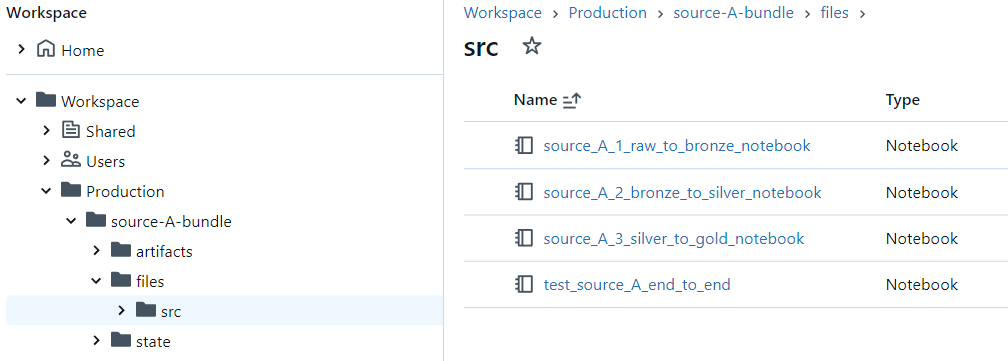
Furthermore, We specified the file path for our deployment to be /Production/bundle.name and to exclude the folder ./resources/ (in addition to what we specified in the top level mapping):
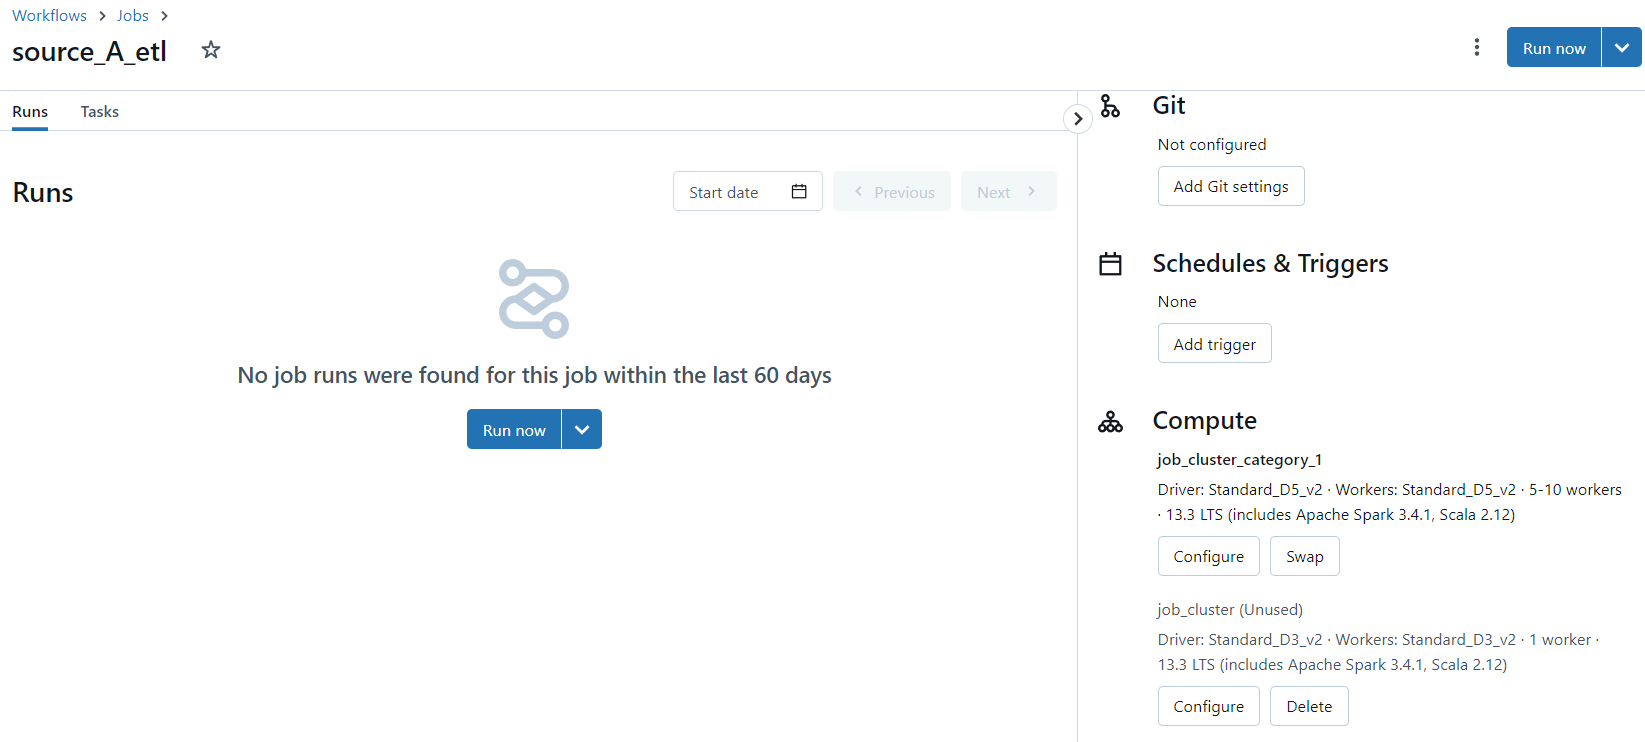
And finally, we expect the tasks within source_A_etl job to have a job cluster assigned named job_cluster_category_1 with some extra workers and an upgraded node type:
Closing Words
In this post we have walked through an example of how CI/CD can be carried out using Databricks Asset Bundles (DAB) and The Nutter testing framework.
We have learned the basics of DAB and have leveraged some of its functionality to adjust and fine tune our CI/CD pattern to fit our requirements and needs.
We have seen that by deploying our testing notebook alongside our ETL jobs into running it all on Databricks clusters, we have a consolidated and transparent pattern all stored in one place. By using this pattern, we also get a cloud platform agnostic solution - it can be ported to any one of the platform providers that have databricks offerings.
Hope you found this post interesting and useful!
Final thanks to my friends Karol Luszczek and Richard Nordström for all the valueable input.
/K
